DockerLabs Workshop
1. Demonstrating Hello World Example
Tested Infrastructure
| Platform | Number of Instance | Reading Time |
|---|---|---|
| Play with Docker | 1 | 5 min |
Pre-requisite
Create an account with [DockerHub]
Open [PWD] Platform on your browser
Click on **Add New Instance** on the left side of the screen to bring up Alpine OS instance on the right side
Running Hello World Example
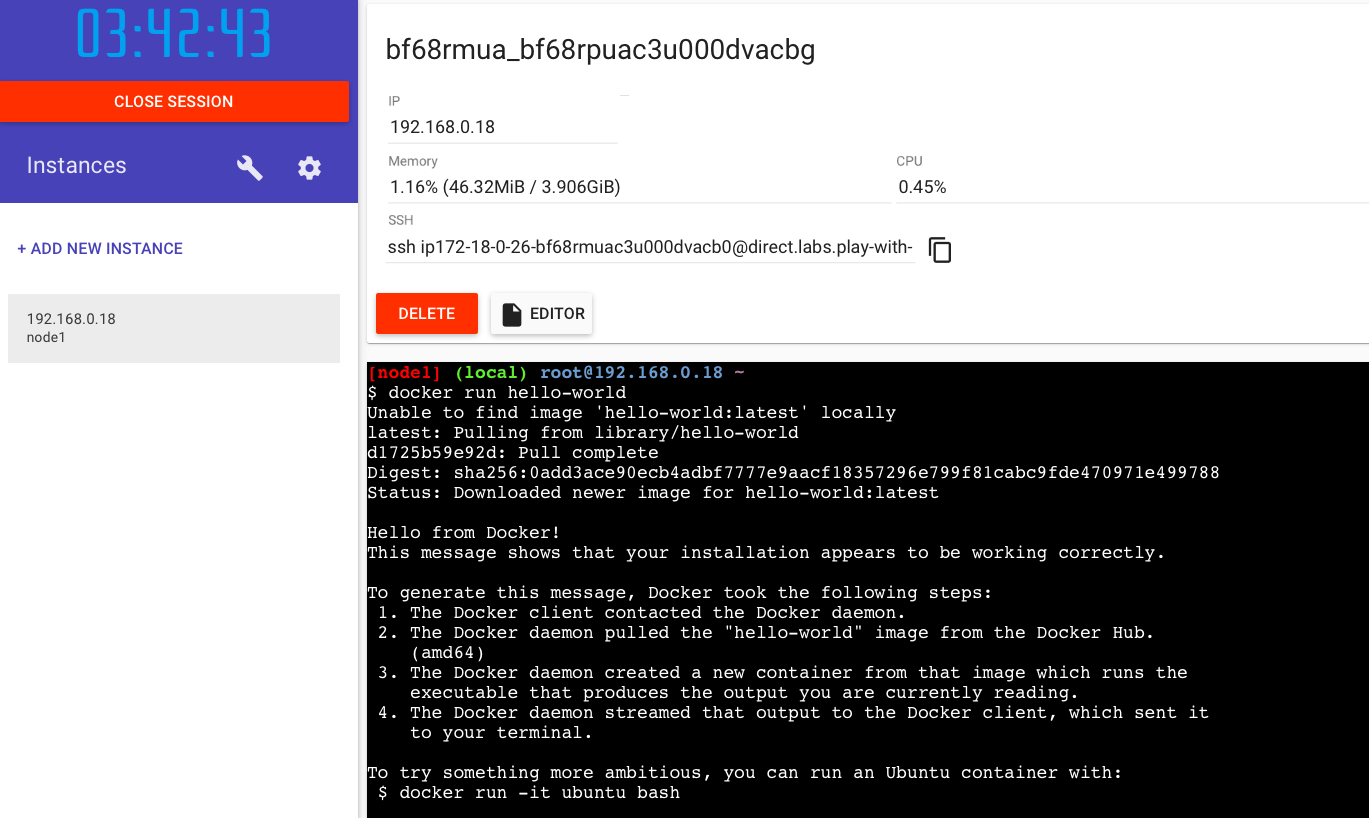
$ docker run hello-world
Explanation
This image is a prime example of using the scratch image effectively. See hello.c in https://github.com/docker-library/hello-world for the source code of the hello binary included in this image. So what’s happened here? We’ve called the docker run command, which is responsible for launching containers.The argument hello-world is the name of the image someone created on dockerhub for us. It will first search for "hello-world" image locally and then search in Dockerhub. Once the image has been downloaded, Docker turns the image into a running container and executes it.
Did you Know?
1.The Hello World Docker Image is only 1.84 KB size.
[node1] (local) root@192.168.0.18 ~
$ docker images
REPOSITORY          TAG                 IMAGE ID            CREATED             SIZE
hello-world         latest              4ab4c602aa5e        6 weeks ago         1.84kB
2.While running docker ps command, it doesn't display any running container. Reason - It gets executed once and exit immediately.
$ docker ps
CONTAINER ID        IMAGE               COMMAND             CREATED             STATUS.         PORTS               NAMES
3. You can use ` docker inspect
$ docker inspect 4ab
[
    {
        "Id": "sha256:4ab4c602aa5eed5528a6620ff18a1dc4faef0e1ab3a5eddeddb410714478c67f",
        "RepoTags": [
            "hello-world:latest"
        ],
        "RepoDigests": [
            "hello-world@sha256:0add3ace90ecb4adbf7777e9aacf18357296e799f81cabc9fde470971e499788"
        ],
        "Parent": "",
        "Comment": "",
        "Created": "2018-09-07T19:25:39.809797627Z",
        "Container": "15c5544a385127276a51553acb81ed24a9429f9f61d6844db1fa34f46348e420",
        "ContainerConfig": {
            "Hostname": "15c5544a3851",
            "Domainname": "",
            "User": "",
            "AttachStdin": false,
            "AttachStdout": false,
            "AttachStderr": false,
            "Tty": false,
            "OpenStdin": false,
            "StdinOnce": false,
            "Env": [
                "PATH=/usr/local/sbin:/usr/local/bin:/usr/sbin:/usr/bin:/sbin:/bin"
            ],
            "Cmd": [
                "/bin/sh",
                "-c",
                "#(nop) ",
                "CMD [\"/hello\"]"
            ],
            "ArgsEscaped": true,
            "Image": "sha256:9a5813f1116c2426ead0a44bbec252bfc5c3d445402cc1442ce9194fc1397027",
            "Volumes": null,
            "WorkingDir": "",
            "Entrypoint": null,
            "OnBuild": null,
            "Labels": {}
        },
        "DockerVersion": "17.06.2-ce",
        "Author": "",
        "Config": {
            "Hostname": "",
            "Domainname": "",
            "User": "",
            "AttachStdin": false,
            "AttachStdout": false,
            "AttachStderr": false,
            "Tty": false,
            "OpenStdin": false,
            "StdinOnce": false,
            "Env": [
                "PATH=/usr/local/sbin:/usr/local/bin:/usr/sbin:/usr/bin:/sbin:/bin"
            ],
            "Cmd": [
                "/hello"
            ],
            "ArgsEscaped": true,
            "Image": "sha256:9a5813f1116c2426ead0a44bbec252bfc5c3d445402cc1442ce9194fc1397027",
            "Volumes": null,
            "WorkingDir": "",
            "Entrypoint": null,
            "OnBuild": null,
            "Labels": null
        },
        "Architecture": "amd64",
        "Os": "linux",
        "Size": 1840,
        "VirtualSize": 1840,
        "GraphDriver": {
            "Data": {
                "MergedDir": "/var/lib/docker/overlay2/e494ae30abc49ad403ef5c2a32bcb894629ea4da6d4d226fbca70d27ed9a74d8/merged",
                "UpperDir": "/var/lib/docker/overlay2/e494ae30abc49ad403ef5c2a32bcb894629ea4da6d4d226fbca70d27ed9a74d8/diff",
                "WorkDir": "/var/lib/docker/overlay2/e494ae30abc49ad403ef5c2a32bcb894629ea4da6d4d226fbca70d27ed9a74d8/work"
            },
            "Name": "overlay2"
        },
        "RootFS": {
            "Type": "layers",
            "Layers": [
                "sha256:428c97da766c4c13b19088a471de6b622b038f3ae8efa10ec5a37d6d31a2df0b"
            ]
        },
        "Metadata": {
            "LastTagTime": "0001-01-01T00:00:00Z"
        }
    }
]
2. Working with Docker Images
Tested Infrastructure
| Platform | Number of Instance | Reading Time |
|---|---|---|
| Play with Docker | 1 | 5 min |
Pre-requisite
Create an account with [DockerHub]
Open [PWD] Platform on your browser
Click on **Add New Instance** on the left side of the screen to bring up Alpine OS instance on the right side
Listing the Docker Images
                  $ docker images

		  REPOSITORY          TAG                 IMAGE ID            CREATED             SIZE
                  hello-world         latest              4ab4c602aa5e        6 weeks ago         1.84kB
Show all images (default hides intermediate images)
$ docker images -a
REPOSITORY          TAG                 IMAGE ID            CREATED             SIZE
hello-world         latest              4ab4c602aa5e        6 weeks ago         1.84kB
List images by name and tag
The docker images command takes an optional [REPOSITORY[:TAG]] argument that restricts the list to images that match the argument. If you specify REPOSITORY but no TAG, the docker images command lists all images in the given repository. To demo this, let us pull all various versions of alpine OS
		docker pull alpine:3.6
                docker pull alpine:3.7
                docker pull alpine:3.8
                docker pull alpine:3.9
[node4] (local) root@192.168.0.20 ~
$ docker images
REPOSITORY          TAG                 IMAGE ID            CREATED             SIZE
alpine              3.6                 43773d1dba76        7 days ago          4.03MB
alpine              3.7                 6d1ef012b567        7 days ago          4.21MB
alpine              3.8                 dac705114996        7 days ago          4.41MB
alpine              3.9                 5cb3aa00f899        7 days ago          5.53MB
[node4] (local) root@192.168.0.20 ~
$ docker images alpine:3.7
REPOSITORY          TAG                 IMAGE ID            CREATED             SIZE
alpine              3.7                 6d1ef012b567        7 days ago          4.21MB
List the full length image IDs
$ docker images --no-trunc
REPOSITORY          TAG                 IMAGE ID                                                                  CREATED
     SIZE
alpine              3.6                 sha256:43773d1dba76c4d537b494a8454558a41729b92aa2ad0feb23521c3e58cd0440   7 days ago
     4.03MB
alpine              3.7                 sha256:6d1ef012b5674ad8a127ecfa9b5e6f5178d171b90ee462846974177fd9bdd39f   7 days ago
     4.21MB
alpine              3.8                 sha256:dac7051149965716b0acdcab16380b5f4ab6f2a1565c86ed5f651e954d1e615c   7 days ago
     4.41MB
alpine              3.9                 sha256:5cb3aa00f89934411ffba5c063a9bc98ace875d8f92e77d0029543d9f2ef4ad0   7 days ago
     5.53MB
Listing out images with filter
$ docker images
REPOSITORY          TAG                 IMAGE ID            CREATED             SIZE
ubuntu              latest              94e814e2efa8        3 days ago          88.9MB
alpine              3.6                 43773d1dba76        7 days ago          4.03MB
alpine              3.7                 6d1ef012b567        7 days ago          4.21MB
alpine              3.8                 dac705114996        7 days ago          4.41MB
alpine              3.9                 5cb3aa00f899        7 days ago          5.53MB
If you want to filter out just alpine
$ docker images --filter=reference='alpine'
REPOSITORY          TAG                 IMAGE ID            CREATED             SIZE
alpine              3.6                 43773d1dba76        7 days ago          4.03MB
alpine              3.7                 6d1ef012b567        7 days ago          4.21MB
alpine              3.8                 dac705114996        7 days ago          4.41MB
alpine              3.9                 5cb3aa00f899        7 days ago          5.53MB
Explanation
The [REPOSITORY[:TAG]] value must be an “exact match”.
3. Saving Images and Containers as Tar Files for Sharing
Tested Infrastructure
| Platform | Number of Instance | Reading Time |
|---|---|---|
| Play with Docker | 1 | 5 min |
Pre-requisite
Create an account with [DockerHub]
Open [PWD] Platform on your browser
Click on **Add New Instance** on the left side of the screen to bring up Alpine OS instance on the right side
Imagine a scenario where you have built Docker images and containers that you would be interested to keep and share it with your other collaborators or colleagues. The below methods shall help you achieve it.
Four basic Docker CLI comes into action:
The docker export - Export a container’s filesystem as a tar archive
The docker import - Import the contents from a tarball to create a filesystem image
The docker save - Save one or more images to a tar archive (streamed to STDOUT by default)
The docker load - Load an image from a tar archive or STDIN
Create Nginx Container
$ docker run -d -p 80:80 nginx
Unable to find image 'nginx:latest' locally
latest: Pulling from library/nginx
a5a6f2f73cd8: Pull complete
1ba02017c4b2: Pull complete
33b176c904de: Pull complete
Digest: sha256:5d32f60db294b5deb55d078cd4feb410ad88e6fe77500c87d3970eca97f54dba
Status: Downloaded newer image for nginx:latest
df2caf9283e84a15bb2321a17aabe84e3e0762ec82fc180e2a4c15fcf0f96588
[node1] (local) root@192.168.0.33 ~
Displaying Running Container
	$ docker ps -a
CONTAINER ID        IMAGE               COMMAND                  CREATED             STATUS              PORTS                NAMES
df2caf9283e8        nginx               "nginx -g 'daemon of…"   35 seconds ago      Up 34 seconds       0.0.0.0:80->80/tcp   vigorous_jang
$ docker export df2 > nginx.tar
You could commit this container as a new image locally, but you could also use the Docker import command:
	$ docker import - mynginx < nginx.tar
          sha256:aaaed50d250a671042e8dc383c6e05012e245f5eaf555d10c40be63f6028ee7b
$ docker images
REPOSITORY          TAG                 IMAGE ID            CREATED             SIZE
mynginx             latest              aaaed50d250a        25 seconds ago      107MB
nginx               latest              568c4670fa80        2 weeks ago         109MB
If you wanted to share this image with one of your collaborators, you could upload the tar file on a web server and let your collaborator download it and use the import command on his Docker host. If you would rather deal with images that you have already committed, you can use the load and save commands:
$ docker save -o mynginx1.tar nginx
$ ls -l
total 218756
-rw-------    1 root     root     112844800 Dec 18 02:53 mynginx1.tar
-rw-r--r--    1 root     root     111158784 Dec 18 02:50 nginx.tar
$ docker rmi mynginx
Untagged: mynginx:latest
Deleted: sha256:aaaed50d250a671042e8dc383c6e05012e245f5eaf555d10c40be63f6028ee7b
Deleted: sha256:41135ad184eaac0f5c4f46e4768555738303d30ab161a7431d28a5ccf1778a0f
Now delete all images and containers running and try to run the below command to load Docker image into your system:
$ docker images
REPOSITORY          TAG                 IMAGE ID            CREATED             SIZE
$ docker load < mynginx1.tar
Loaded image: nginx:latest
[node1] (local) root@192.168.0.33 ~$ docker images
REPOSITORY          TAG                 IMAGE ID            CREATED             SIZE
nginx               latest              568c4670fa80        2 weeks ago         109MB
[node1] (local) root@192.168.0.33 ~
$
4. How to build Your First Alpine Docker Image and Push it to DockerHub
Tested Infrastructure
| Platform | Number of Instance | Reading Time |
|---|---|---|
| Play with Docker | 1 | 5 min |
Pre-requisite
Create an account with [DockerHub]
Open [PWD] Platform on your browser
Click on **Add New Instance** on the left side of the screen to bring up Alpine OS instance on the right side
Under this tutorial we will see how to build our own first alpine based Docker Image
		$ docker run -dit alpine sh
                620e1bcb5ab6e84b75a7a5c35790a77691112e59830ea1d5d85244bc108578c9
               [node4] (local) root@192.168.0.20 ~
 $ docker ps
CONTAINER ID        IMAGE               COMMAND             CREATED             STATUS              PORTS               NAMES
620e1bcb5ab6        alpine              "sh"                3 seconds ago       Up 2 seconds                            keen_alba
ttani
[node4] (local) root@192.168.0.20 ~
$ docker attach 62
/ #
/ #
/ # cat /etc/os-release
NAME="Alpine Linux"
ID=alpine
VERSION_ID=3.9.2
PRETTY_NAME="Alpine Linux v3.9"
HOME_URL="https://alpinelinux.org/"
BUG_REPORT_URL="https://bugs.alpinelinux.org/"
/ #
Updating APK Packages
/ # apk update
fetch http://dl-cdn.alpinelinux.org/alpine/v3.9/main/x86_64/APKINDEX.tar.gz
fetch http://dl-cdn.alpinelinux.org/alpine/v3.9/community/x86_64/APKINDEX.tar.gz
v3.9.2-21-g3dda2a36ce [http://dl-cdn.alpinelinux.org/alpine/v3.9/main]
v3.9.2-19-gfdf726d41a [http://dl-cdn.alpinelinux.org/alpine/v3.9/community]
OK: 9756 distinct packages available
/ # ^
/ # apk add git
(1/7) Installing ca-certificates (20190108-r0)
(2/7) Installing nghttp2-libs (1.35.1-r0)
(3/7) Installing libssh2 (1.8.0-r4)
(4/7) Installing libcurl (7.64.0-r1)
(5/7) Installing expat (2.2.6-r0)
(6/7) Installing pcre2 (10.32-r1)
(7/7) Installing git (2.20.1-r0)
Executing busybox-1.29.3-r10.trigger
Executing ca-certificates-20190108-r0.trigger
OK: 20 MiB in 21 packages
/ #
$ docker ps
CONTAINER ID        IMAGE               COMMAND             CREATED             STATUS              PORTS               NAMES
620e1bcb5ab6        alpine              "sh"                4 minutes ago       Up 4 minutes                            keen_alba
ttani
[node4] (local) root@192.168.0.20 ~
$ docker commit -m "Added GIT" 620 ajeetraina/alpine-git
sha256:9a8cd6c3bd8761013b2b932c58af2870f5637bfdf4227d7414073b0458ed0c54
[node4] (local) root@192.168.0.20 ~
$ docker images
REPOSITORY              TAG                 IMAGE ID            CREATED             SIZE
ajeetraina/alpine-git   latest              9a8cd6c3bd87        11 seconds ago      31.2MB
ubuntu                  latest              94e814e2efa8        3 days ago          88.9MB
alpine                  3.6                 43773d1dba76        7 days ago          4.03MB
alpine                  3.7                 6d1ef012b567        7 days ago          4.21MB
alpine                  3.8                 dac705114996        7 days ago          4.41MB
alpine                  3.9                 5cb3aa00f899        7 days ago          5.53MB
alpine                  latest              5cb3aa00f899        7 days ago          5.53MB
There you see a new image just created
Time to tag the image
$ docker tag --help

Usage:  docker tag SOURCE_IMAGE[:TAG] TARGET_IMAGE[:TAG]

Create a tag TARGET_IMAGE that refers to SOURCE_IMAGE
[node4] (local) root@192.168.0.20 ~
$ docker tag ajeetraina/alpine-git:latest ajeetraina/alpine-git:1.0
$ docker images
REPOSITORY              TAG                 IMAGE ID            CREATED             SIZE
ajeetraina/alpine-git   1.0                 9a8cd6c3bd87        2 minutes ago       31.2MB
ajeetraina/alpine-git   latest              9a8cd6c3bd87        2 minutes ago       31.2MB
ubuntu                  latest              94e814e2efa8        3 days ago          88.9MB
alpine                  3.6                 43773d1dba76        7 days ago          4.03MB
alpine                  3.7                 6d1ef012b567        7 days ago          4.21MB
alpine                  3.8                 dac705114996        7 days ago          4.41MB
alpine                  3.9                 5cb3aa00f899        7 days ago          5.53MB
alpine                  latest              5cb3aa00f899        7 days ago          5.53MB
Pushing it to DockerHub
$ docker login
Login with your Docker ID to push and pull images from Docker Hub. If you don't have a Docker ID, head over to https://hub.docker
.com to create one.
Username: ajeetraina
Password:
WARNING! Your password will be stored unencrypted in /root/.docker/config.json.
Configure a credential helper to remove this warning. See
https://docs.docker.com/engine/reference/commandline/login/#credentials-store

Login Succeeded
[node4] (local) root@192.168.0.20 ~
$ docker push ajeetraina/alpine-git:1.0
The push refers to repository [docker.io/ajeetraina/alpine-git]
3846235f8c17: Pushed
bcf2f368fe23: Mounted from library/alpine
1.0: digest: sha256:85d50f702e930db9e5b958387e667b7e26923f4de340534085cea184adb8411e size: 740
[node4] (local) root@192.168.0.20 ~
5. Building Docker Image from Scratch
Tested Infrastructure
| Platform | Number of Instance | Reading Time |
|---|---|---|
| Play with Docker | 1 | 5 min |
You can use Docker’s reserved, minimal image, scratch, as a starting point for building containers. Using the scratch “image” signals to the build process that you want the next command in the Dockerfile to be the first filesystem layer in your image. While scratch appears in Docker’s repository on the hub, you can’t pull it, run it, or tag any image with the name scratch. Instead, you can refer to it in your Dockerfile. For example, to create a minimal container using scratch:
FROM scratch
ADD hello /
CMD ["/hello"]
Assuming you built the “hello” executable example by following the instructions at https://github.com/docker-library/hello-world/, and you compiled it with the -static flag, you can build this Docker image using this docker build command:
docker build --tag hello .
Don’t forget the . character at the end, which sets the build context to the current directory.
$ docker run --rm -it -v $PWD:/build ubuntu:16.04
container# apt-get update && apt-get install build-essential
container# cd /build
container# gcc -o hello -static -nostartfiles hello.c
To run your new image, use the docker run command:
docker run --rm hello
This example creates the hello-world image used in the tutorials. If you want to test it out, you can clone the image repo.
6.Accessing the Container Shell
Tested Infrastructure
| Platform | Number of Instance | Reading Time |
|---|---|---|
| Play with Docker | 1 | 5 min |
Create Ubuntu Container
docker run -dit ubuntu
Accessing the container shell
docker exec -t bash
Accesssing the container shell
docker attach
7.Running a command inside running Container
Tested Infrastructure
| Platform | Number of Instance | Reading Time |
|---|---|---|
| Play with Docker | 1 | 5 min |
Create Ubuntu Container
docker run -dit ubuntu
Opening up the bash shell
docker exec -t bash
8.Managing Docker containers
Tested Infrastructure
| Platform | Number of Instance | Reading Time |
|---|---|---|
| Play with Docker | 1 | 5 min |
Preparations
Clean your docker host using the commands (in bash):
$ docker rm -f $(docker ps -a -q)
Instructions
Run the following containers from the dockerhub:
$ docker run -d -p 5000:5000 --name app1 selaworkshops/python-app:1.0
$ docker run -d -p 5001:5001 -e "port=5001" --name app2 selaworkshops/python-app:2.0
Ensure the containers are running:
$ docker ps
Stop the first container:
$ docker stop app1
Kill the second container:
$ docker kill app2
Display running containers:
docker ps
Show all the containers (including non running containers):
docker ps -a
Let’s start both containers again:
$ docker start app1 app2
Restart the second container:
$ docker restart app2
Display the docker host information with:
$ docker info
Show the running processes in the first container using:
$ docker top app1
Retrieve the history of the second container:
$ docker history selaworkshops/python-app:2.0
Inspect the second container image:
$ docker inspect selaworkshops/python-app:2.0
Inspect the first container and look for the internal ip:
$ docker inspect app1
		"Networks": {
             "bridge": {
                 "IPAMConfig": null,
                 "Links": null,
                 "Aliases": null,
                 "NetworkID": "822cb66790c6358d9decab874916120f3bdeff7193a4375c94ca54d50832303d",
                 "EndpointID": "9aa96dc29be08eddc6d8f429ebecd2285c064fda288681a3611812413cbdfc1f",
                 "Gateway": "172.17.0.1",
                 "IPAddress": "172.17.0.3",
                 "IPPrefixLen": 16,
                 "IPv6Gateway": "",
                 "GlobalIPv6Address": "",
                 "GlobalIPv6PrefixLen": 0,
                 "MacAddress": "02:42:ac:11:00:03",
                 "DriverOpts": null
             }
         }
Show the logs of the second container using the flag –follow:
$ docker logs --follow app2
Browse to the application and see the containers logs from the terminal:
http://localhost:5001
Stop to tracking logs:
$ CTRL + C
What is a Dockerfile?
- A Dockerfile is a text file which contains a series of commands or instructions.
- These instructions are executed in the order in which they are written.
- Execution of these instructions takes place on a base image.
- On building the Dockerfile, the successive actions form a new image from the base parent image.
- We will go through each of instructions under Dockerfile and see how it is used.
Deep Drive Into Dockerfile
Understanding Image Layering Concept with Dockerfile
Tested Infrastructure
| Platform | Number of Instance | Reading Time |
|---|---|---|
| Play with Docker | 1 | 5 min |
Docker container is a runnable instance of an image, which is actually made by writing a readable/writable layer on top of some read-only layers.
The parent image used to create another image from a Dockerfile is read-only. When we execute instructions on this parent image, new layers keep adding up. These layers are created when we run docker build command.
The instructions RUN, COPY, ADD mostly contribute to the addition of layers in a Docker build.
Each layer is read-only except the last one - this is added to the image for generating a runnable container. This last layer is called “container layer”. All changes made to the container, like making new files, installing applications, etc. are done in this thin layer.
Let’s understand this layering using an example:
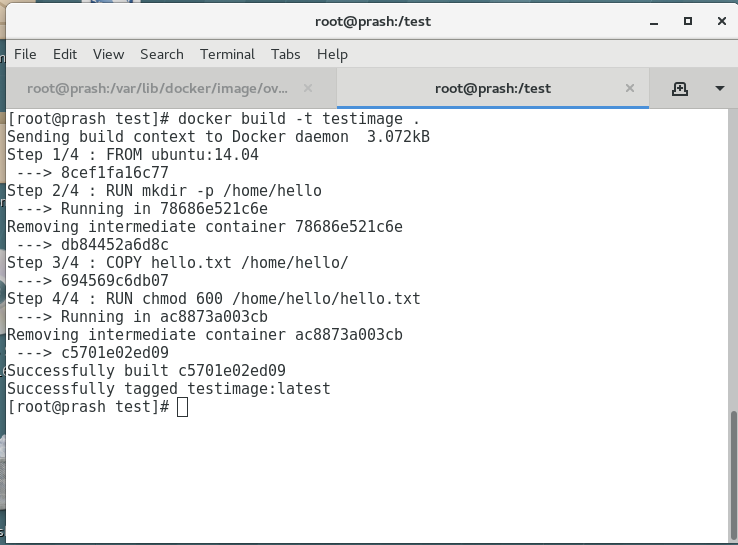
Consider the Dockerfile given below:
FROM ubuntu:latest
RUN mkdir -p /hello/hello
COPY hello.txt /hello/hello
RUN chmod 600 /hello/hello/hello.txt
Layer ID
Each instruction the Dockerfile generates a layer. Each of this layer has a randomly generated unique ID. This ID can be seen at the time of build. See the image next slide
To view all these layers once an image is built from a Dockerfile, we can use docker history command.
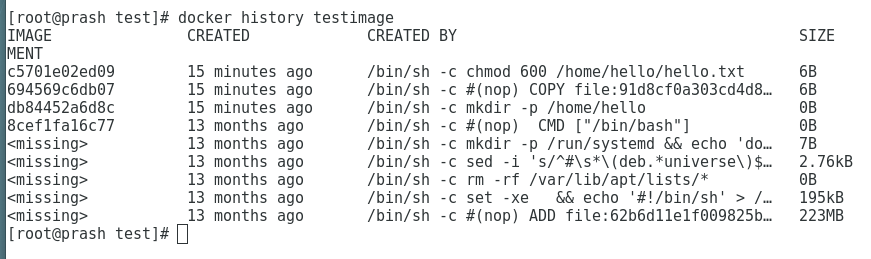
To view all these layers once an image is built from a Dockerfile, we can use docker history command
To see more information about the Docker image and the layers use ‘docker inspect’ command as such:
	# docker inspect testimage:latest

[
    {
        "Id": "sha256:c5701e02ed095ae7cabaef9fcef009d1f272206ff707deca13a680e024db7f02",
        "RepoTags": [
            "testimage:latest"
        ],
        "RepoDigests": [],
        "Parent": "sha256:694569c6db07ecef432cee1a9a4a6d45f2fd1f6be16814bf59e101bed966e612",
        "Comment": "",
        "Created": "2019-06-03T23:47:01.026463541Z",
        "Container": "ac8873a003cb9ed972b4675f8d27181b99112e7530a5803ff89780e3ecc18b1c",
        "ContainerConfig": {
            "Hostname": "",
            "Domainname": "",
            "User": "",
            "AttachStdin": false,
            "AttachStdout": false,
            "AttachStderr": false,
            "Tty": false,
            "OpenStdin": false,
            "StdinOnce": false,
            "Env": [
                "PATH=/usr/local/sbin:/usr/local/bin:/usr/sbin:/usr/bin:/sbin:/bin"
            ],
            "Cmd": [
                "/bin/sh",
                "-c",
                "chmod 600 /home/hello/hello.txt"
            ],
            "ArgsEscaped": true,
            "Image": "sha256:694569c6db07ecef432cee1a9a4a6d45f2fd1f6be16814bf59e101bed966e612",
            "Volumes": null,
            "WorkingDir": "",
            "Entrypoint": null,
            "OnBuild": null,
            "Labels": null
        },
        "DockerVersion": "18.03.1-ce",
        "Author": "",
        "Config": {
            "Hostname": "",
            "Domainname": "",
            "User": "",
            "AttachStdin": false,
            "AttachStdout": false,
            "AttachStderr": false,
            "Tty": false,
            "OpenStdin": false,
            "StdinOnce": false,
            "Env": [
                "PATH=/usr/local/sbin:/usr/local/bin:/usr/sbin:/usr/bin:/sbin:/bin"
            ],
            "Cmd": [
                "/bin/bash"
            ],
            "ArgsEscaped": true,
            "Image": "sha256:694569c6db07ecef432cee1a9a4a6d45f2fd1f6be16814bf59e101bed966e612",
            "Volumes": null,
            "WorkingDir": "",
            "Entrypoint": null,
            "OnBuild": null,
            "Labels": null
        },
        "Architecture": "amd64",
        "Os": "linux",
        "Size": 222876395,
        "VirtualSize": 222876395,
        "GraphDriver": {
            "Data": {
                "LowerDir": "/var/lib/docker/overlay2/86a76eac21ae67f6d78e59076107a121e6dfb9cc922e68e1be975fc97e711eb1/diff:/var/lib/docker/overlay2/0604b502d31eff670769257ba3411fca09fbe2eab03343660ba557024915a1e6/diff:/var/lib/docker/overlay2/16af32e079fbc252ea5de044628285d5c3a34fc8441602a762729482666b2431/diff:/var/lib/docker/overlay2/732c4ab0164f92664ce831b4a830251132bf17cbcb7d093334a7a367b1a665e5/diff:/var/lib/docker/overlay2/c8a69709e5093c6eefa317f015cbf1422a446b2fe5d3f3d52a7e0d8af8dc6a28/diff:/var/lib/docker/overlay2/c93b36ec3a753592518727a2ea4547ab4e53d58489b9fae0838b2806e9c18346/diff:/var/lib/docker/overlay2/e67589599c2a5ed3bd74a269f3effaa52f94975fd811a866f1fe2bbcb2edabe4/diff",
                "MergedDir": "/var/lib/docker/overlay2/31c68adcd824f155d23de4197b3d0b8776b079c307c1e4c0f2f8bbc73807adc0/merged",
                "UpperDir": "/var/lib/docker/overlay2/31c68adcd824f155d23de4197b3d0b8776b079c307c1e4c0f2f8bbc73807adc0/diff",
                "WorkDir": "/var/lib/docker/overlay2/31c68adcd824f155d23de4197b3d0b8776b079c307c1e4c0f2f8bbc73807adc0/work"
            },
            "Name": "overlay2"
        },
        "RootFS": {
            "Type": "layers",
            "Layers": [
                "sha256:05b0f7f2a81723fd647744a7340477ef9619f5ddeba3f2ca039dac3dd143cd59",
                "sha256:0c3819952093832ffd8865bf72bc17f2f5475795cffe97e2b4c4ff36e638c244",
                "sha256:14fa4a9494bf9e61f83a1bb96cd9e963ab0cbbdaf8ed91ff5eec5196c5bf7b12",
                "sha256:b33859b66bfd3ad176ccf3be8dbd52d6b9823de8cc26688f2efeb76a0ea24a78",
                "sha256:4622c8e1bdc0716e185fa3b338fa415dfdad3724336315de0bebd173a6ceaf05",
                "sha256:6427efc3a0d7bae1fe315b844703580b2095073dcdf54a6ed9c7b1c0d982d9b0",
                "sha256:59cd898074ac7765bacd76a11724b8d666ed8e9c14e7806dfb20a486102f6f1e",
                "sha256:ad24f18512fddb8794612f7ec5955d06dcee93641d02932d809f0640263b8e79"
            ]
        },
        "Metadata": {
            "LastTagTime": "2019-06-04T05:17:01.430558997+05:30"
        }
    }
]
Lab #1: Create an image with GIT installed
Tested Infrastructure
| Platform | Number of Instance | Reading Time |
|---|---|---|
| Play with Docker | 1 | 5 min |
Assignment:
- Create an image with GIT installed
- Tag your image as labs-git:v1.0.
- Create a container based on that image, and run git –version to check that it is installed correctly
Creating Dockerfile
FROM alpine:3.5
RUN apk update
RUN apk add git
Build Docker Image
docker build -t ajeetraina/alpine-git .
Tagging image as labs-git
docker tag ajeetraina/alpine-git ajeetraina/labs-git:v1.0
Verify the Images
$ docker images
REPOSITORY              TAG                 IMAGE ID            CREATED             SIZE
ajeetraina/alpine-git   latest              cb913e37a593        16 seconds ago      26.6MB
ajeetraina/labs-git     v1.0                cb913e37a593        16 seconds ago      26.6MB
Create a container
docker run -itd ajeetraina/labs-git:v1.0 /bin/sh
$ docker ps
CONTAINER ID        IMAGE                      COMMAND             CREATED             STATUS              PORTS               NAMES
3e26a5268f55        ajeetraina/labs-git:v1.0   "/bin/sh"           4 seconds ago       Up 2 seconds                            elated_neumann
Enter into Container Shell
docker attach 3e26
Please press “Enter” key twice so as to enter into container shell
Verify if GIT is installed
/ # git --version
git version 2.13.7
Lab #2: Create an image with ADD instruction
Tested Infrastructure
| Platform | Number of Instance | Reading Time |
|---|---|---|
| Play with Docker | 1 | 5 min |
- Create an image with ADD instruction - Tag your image as labs-add:v1.0 - Create a container based on that image, and see the extracted tar file.
Creating Dockerfile
FROM alpine:3.5
RUN apk update
ADD http://www.vlsitechnology.org/pharosc_8.4.tar.gz .
Build Docker Image
docker build -t saiyam911/alpine-add . -f
Tagging image as labs-git
docker tag saiyam911/alpine-add saiyam911/labs-add:v1.0
Verify the Images
$ docker images
REPOSITORY                   TAG                 IMAGE ID            CREATED             SIZE
saiyam911/alpine-add        latest              cdf97cb49d48        38 minutes ago       300MB
saiyam911/labs-add          v1.0                cdf97cb49d48        38 minutes ago       300MB
Create a container
docker run -itd saiyam911/labs-add:v1.0 /bin/sh

$ docker ps
CONTAINER ID        IMAGE                      COMMAND             CREATED             STATUS              PORTS               NAMES
f0940750f61a        saiyam911/labs-add:v1.0   "/bin/sh"           20 seconds ago      Up 18 seconds                           distracted_darwin
Enter into Container Shell
docker attach f094
Please press “Enter” key twice so as to enter into container shell
Verify if the link has been extracted onto the container
/ # ls -ltr
-rw-------    1 root     root     295168000 Sep 19  2007 pharosc_8.4.tar.gz
ADD Command lets you to add a tar directly from a link and explode to the container.
Lab #3: Create an image with COPY instruction
Tested Infrastructure
| Platform | Number of Instance | Reading Time |
|---|---|---|
| Play with Docker | 1 | 5 min |
The COPY instruction copies files or directories from source and adds them to the filesystem of the container at destinatio.
Two form of COPY instruction
COPY [--chown=:] ...
COPY [--chown=:] ["",... ""] (this form is required for paths containing whitespace)
Assignment:
- Create an image with COPY instruction
- COPY instruction in Multi-stage Builds
Create an image with COPY instruction
Dockerfile
FROM nginx:alpine
LABEL maintainer="Collabnix"
COPY index.html /usr/share/nginx/html/
ENTRYPOINT ["nginx", "-g", "daemon off;"]
Lets create the index.html file
$ echo "Welcome to Dockerlabs !" > index.html
Building Docker Image
$ docker image build -t cpy:v1 .
Staring the container
$ docker container run -d --rm --name myapp1 -p 80:80 cpy:v1
Checking index file
$ curl localhost
Welcome to Dockerlabs !
COPY instruction in Multi-stage Builds
    FROM alpine AS stage1
    LABEL maintainer="Collabnix"
    RUN echo "Welcome to Docker Labs!" > /opt/index.html

   FROM nginx:alpine
   LABEL maintainer="Collabnix"
   COPY --from=stage1 /opt/index.html /usr/share/nginx/html/
   ENTRYPOINT ["nginx", "-g", "daemon off;"]
Building Docker Image
$ docker image build -t cpy:v2 .
Staring the container
$ docker container run -d --rm --name myapp2 -p 8080:80 cpy:v2
Checking index file
$ curl localhost:8080
Welcome to Docker Labs !
NOTE: You can name your stages, by adding an AS to the FROM instruction.By default, the stages are not named, and you can refer to them by their integer number, starting with 0 for the first FROM instruction.You are not limited to copying from stages you created earlier in your Dockerfile, you can use the COPY --from instruction to copy from a separate image, either using the local image name, a tag available locally or on a Docker registry.
COPY --from=nginx:latest /etc/nginx/nginx.conf /nginx.conf
Lab #4: Create an image with CMD instruction
Tested Infrastructure
| Platform | Number of Instance | Reading Time |
|---|---|---|
| Play with Docker | 1 | 5 min |
Creating Dockerfile
FROM alpine:3.6

RUN apk update
CMD ["top"]
Building Docker Container
docker build -t ajeetraina/lab3_cmd . -f Dockerfile_cmd
Running the Docker container
docker run ajeetraina/lab3_cmd:latest
Lab #5 : Create an image with ENTRYPOINT instruction
Tested Infrastructure
| Platform | Number of Instance | Reading Time |
|---|---|---|
| Play with Docker | 1 | 5 min |
The ENTRYPOINT instruction make your container run as an executable.
ENTRYPOINT can be configured in two forms:
Exec Form
ENTRYPOINT [“executable”, “param1”, “param2”]
Shell Form
ENTRYPOINT command param1 param2
If an image has an ENTRYPOINT if you pass an argument it, while running container it wont override the existing entrypoint, it will append what you passed with the entrypoint.To override the existing ENTRYPOINT you should user –entrypoint flag when running container.
Assignment:
Create an image with ENTRYPOINT instruction(Exec Form)
ENTRYPOINT instruction in Shell Form
Override the existing ENTRYPOINT
Create an image with ENTRYPOINT instruction(Exec Form
Dockerfile
FROM alpine:3.5
LABEL maintainer="Collabnix"

ENTRYPOINT ["/bin/echo", "Hi, your ENTRYPOINT instruction in Exec Form !"]
Build Docker Image
$ docker build -t entrypoint:v1 .
Verify the Image
$ docker image ls

REPOSITORY          TAG                 IMAGE ID            CREATED             SIZE
entrypoint          v1                  1d06f06c2062        2 minutes ago       4MB
alpine              3.5                 f80194ae2e0c        7 months ago        4MB
Create a container
$ docker container run entrypoint:v1
Hi, your ENTRYPOINT instruction in Exec Form !
ENTRYPOINT instruction in Shell Form
$ cat Dockerfile
FROM alpine:3.5
LABEL maintainer="Collabnix"

ENTRYPOINT echo "Hi, your ENTRYPOINT instruction in Shell Form !"
Build Docker Image
$ docker build -t entrypoint:v2 .
Verify the Image
$ docker image ls

REPOSITORY          TAG                 IMAGE ID            CREATED             SIZE
entrypoint          v2                  cde521f13080        2 minutes ago       4MB
entrypoint          v1                  1d06f06c2062        5 minutes ago      4MB
alpine              3.5                 f80194ae2e0c        7 months ago        4MB
Create a container
$ docker container run entrypoint:v2
Hi, your ENTRYPOINT instruction in Shell Form !
Override the existing ENTRYPOINT
$ docker container run --entrypoint "/bin/echo" entrypoint:v2 "Hello, Welocme to Docker Meetup! "
Hello, Welocme to Docker Meetup!
Lab #6: WORKDIR instruction
Tested Infrastructure
| Platform | Number of Instance | Reading Time |
|---|---|---|
| Play with Docker | 1 | 5 min |
The WORKDIR directive in Dockerfile defines the working directory for the rest of the instructions in the Dockerfile. The WORKDIR instruction wont create a new layer in the image but will add metadata to the image config. If the WORKDIR doesn’t exist, it will be created even if it’s not used in any subsequent Dockerfile instruction. you can have multiple WORKDIR in same Dockerfile. If a relative path is provided, it will be relative to the previous WORKDIR instruction. `WORKDIR /path/to/workdir` If no WORKDIR is specified in the Dockerfile then the default path is `/.` The WORKDIR instruction can resolve environment variables previously set in Dockerfile using ENV.
Assignment:
Dockerfile with WORKDIR instruction
WORKDIR with Relative path
WORKDIR with Absolute path
WORKDIR with environment variables as path
Dockerfile with WORKDIR instruction
FROM alpine:3.9.3
LABEL maintainer="Collabnix"
WORKDIR /opt
Building Docker image
$ docker build -t workdir:v1 .
Testing current WORKDIR by running container
$ docker run -it workdir:v1 pwd
WORKDIR with relative path
Dockerfile
FROM alpine:3.9.3
LABEL maintainer="Collabnix"

WORKDIR /opt
RUN echo "Welcome to Docker Labs" > opt.txt
WORKDIR folder1
RUN echo "Welcome to Docker Labs" > folder1.txt
WORKDIR folder2
RUN echo "Welcome to Docker Labs" > folder2.txt
Building Docker image.
$ docker build -t workdir:v2 .
Testing current WORKDIR by running container
$ docker run -it workdir:v2 pwd
WORKDIR with environment variables as path
Dockerfile
FROM alpine:3.9.3
LABEL maintainer="Collabnix"

ENV DIRPATH /myfolder
WORKDIR $DIRPATH
Building Docker image
$ docker build -t workdir:v4 .
Testing current WORKDIR by running container
$ docker run -it workdir:v4 pwd
Lab #7: RUN instruction
The ` RUN `instruction execute command on top of the below layer and create a new layer.
RUN instruction can be wrote in two forms:
RUN (shell form)
RUN [“executable”, “param1”, “param2”] (exec form)
Tested Infrastructure
| Platform | Number of Instance | Reading Time |
|---|---|---|
| Play with Docker | 1 | 5 min |
Assignment:
Create an image with RUN instruction
Combining multiple RUN instruction to one
Create an image with RUN instruction
FROM alpine:3.9.3
LABEL maintainer="Collabnix"
RUN apk add --update
RUN apk add curl
RUN rm -rf /var/cache/apk/
$ docker image build -t run:v1 .
Checking layer of the image
$  docker image history run:v1
IMAGE               CREATED             CREATED BY                                      SIZE
NT
5b09d7ba1736        19 seconds ago      /bin/sh -c rm -rf /var/cache/apk/               0B
192115cc597a        21 seconds ago      /bin/sh -c apk add curl                         1.55MB
0518580850f1        43 seconds ago      /bin/sh -c apk add --update                     1.33MB
8590497d994e        45 seconds ago      /bin/sh -c #(nop)  LABEL maintainer=Collabnix   0B
cdf98d1859c1        4 months ago        /bin/sh -c #(nop)  CMD ["/bin/sh"]              0B
           4 months ago        /bin/sh -c #(nop) ADD file:2e3a37883f56a4a27…   5.53MB
Number of layers 6
Checking image size
$ docker image ls run:v1
REPOSITORY          TAG                 IMAGE ID            CREATED             SIZE
run                 v1                  5b09d7ba1736        4 minutes ago       8.42MB
Its 8.42MB
Combining multiple RUN instruction to one
FROM alpine:3.9.3
LABEL maintainer="Collabnix"
RUN apk add --update \ &&
	apk add curl \ &&
	rm -rf /var/cache/apk/
Building Docker image
$ docker image build -t run:v2 .
Checking layer of the image
$ docker image history run:v2
IMAGE               CREATED             CREATED BY                                      SIZE
NT
784298155541        50 seconds ago      /bin/sh -c apk add --update  && apk add curl…   1.55MB
8590497d994e        8 minutes ago       /bin/sh -c #(nop)  LABEL maintainer=Collabnix   0B
cdf98d1859c1        4 months ago        /bin/sh -c #(nop)  CMD ["/bin/sh"]              0B
           4 months ago        /bin/sh -c #(nop) ADD file:2e3a37883f56a4a27…   5.53MB
Number of layers 4
Checking image size
$ docker image ls run:v2
REPOSITORY          TAG                 IMAGE ID            CREATED             SIZE
run                 v2                  784298155541        3 minutes ago       7.08MB

its now 7.08MB