
Lab: AppArmor
Difficulty: Advanced
Time: Approximately 25 minutes
AppArmor (Application Armor) is a Linux Security Module (LSM). It protects the operating system by applying profiles to individual applications or containers. In contrast to managing capabilities with CAP_DROP and syscalls with seccomp, AppArmor allows for much finer-grained control. For example, AppArmor can restrict file operations on specified paths.
In this lab you will learn the basics of AppArmor and how to use it with Docker for improved security.
You will complete the following steps as part of this lab.
- Step 1 - AppArmor primer
- Step 2 - The
default-dockerAppArmor profile - Step 3 - Running a Container without an AppArmor profile
- Step 4 - AppArmor and defense in depth
- Step 5 - Custom AppArmor profile
- Step 6 - Extra for experts
Prerequisites
You will need all of the following to complete this lab:
- A Linux-based Docker Host with AppArmor enabled in the kernel (most Debian-based distros)
- Docker 1.12 or higher
The following command shows you how to check if AppArmor is enabled in your system’s kernel and available to Docker:
Check from Docker 1.12 or higher
   $ docker info | grep apparmor
   Security Options: apparmor seccomp
If the above output does not return a line with apparmor then your system does not have AppArmor enabled in its kernel.
Step 1: AppArmor primer
By default, Docker applies the docker-default AppArmor profile to new containers. In Docker 1.13 and later this is profile is created in tmpfs and then loaded into the kernel. On Docker 1.12 and earlier it is located in /etc/apparmor.d/docker/. You can find more information about it in the documentation.
Here are some quick pointers for how to understand AppArmor profiles:
-
includestatements, such as#include <abstractions/base>, behave just like theirCcounterparts by expanding to additional AppArmor profile contents. -
AppArmor
denyrules have precedence overallowandownerrules. This means thatdenyrules cannot be overridden by subsequentalloworownerrules for the same resource. Moreover, anallowwill be overridden by a subsequentdenyon the same resource -
For file operations,
rcorresponds to read,wto write,kto lock,lto link, andxto execute.
For more information, see the official AppArmor documentation wiki (under active development at this time).
Step 2: The default-docker AppArmor profile
In this step you will check the status of AppArmor on your Docker Host and learn how to identify whether or not Docker containers are running with an AppArmor profile.
- View the status of AppArmor on your Docker Host with the
apparmor_statuscommand. You may need to preceed the command withsudo.
   $ apparmor_status
   apparmor module is loaded.
   10 profiles are loaded.
   10 profiles are in enforce mode.
      /sbin/dhclient
      /usr/bin/lxc-start
      /usr/lib/NetworkManager/nm-dhcp-client.action
      /usr/lib/NetworkManager/nm-dhcp-helper
      /usr/lib/connman/scripts/dhclient-script
      /usr/sbin/tcpdump
      docker-default
      lxc-container-default
      lxc-container-default-with-mounting
      lxc-container-default-with-nesting
   0 profiles are in complain mode.
   2 processes have profiles defined.
   2 processes are in enforce mode.
      /sbin/dhclient (610)
   0 processes are in complain mode.
   0 processes are unconfined but have a profile defined.
Notice the docker-default profile is in enforce mode. This is the AppArmor profile that will be applied to new containers unless overridden with the --security-opts flag.
- Run a new container and put it in the back ground.
$ docker container run -dit --name apparmor1 alpine sh
-
Confirm that the container is running.
$ docker container ls CONTAINER ID IMAGE COMMAND CREATED STATUS PORTS NAMES 1bb16561bc06 alpine "sh" 2 secs ago Up 2 seconds apparmor1 -
Run the
apparmor_statuscommand again.$ apparmor_status apparmor module is loaded. 10 profiles are loaded. 10 profiles are in enforce mode. /sbin/dhclient docker-default <SNIP> 0 profiles are in complain mode. 3 processes have profiles defined. 3 processes are in enforce mode. /sbin/dhclient (610) docker-default (19810) 0 processes are in complain mode. 0 processes are unconfined but have a profile defined.Notice that
docker-defaultis now also listed under processes are in enforcing mode. The value in parenthesis is the PID of the container’s process as seen from the PID namespace of the Docker Host. If you have multiple containers running you will see multipledocker-defaultpolicies listed under processes in enforcing mode.Profiles in enforce mode will actively deny operations based on the AppArmor profile. Profiles in complain mode will log profile violations but will not block functionality.
-
Stop and remove the container started in the previous steps.
$ docker container rm -f apparmor1
1bb16561bc06
In this step you learned how to check the AppArmor status on your Docker Host and how to check if a container is running with the default-docker AppArmor profile.
Step 3: Running a container without an AppArmor profile
In this step you will see how to run a new container without an AppArmor profile.
-
If you haven’t already done so, stop and remove all containers on your system.
$ docker container rm -f $(docker container ls -aq) -
Use the
--security-opt apparmor=unconfinedflag to start a new container in the background without an AppArmor profile.$ docker container run -dit --name apparmor2 \ --security-opt apparmor=unconfined \ alpine sh ace79581a19a....559bd1178fce431e292277d -
Confirm that the container is running.
$ docker container ls CONTAINER ID IMAGE COMMAND CREATED STATUS PORTS NAMES ace79581a19a alpine "sh" 41 secs ago Up 40 secs apparmor2 -
Use the
apparmor_statuscommand to verify that the new container is not running with an AppArmor profile.$ apparmor_status apparmor module is loaded. <SNIP> 1 processes are in enforce mode. /sbin/dhclient (610) 0 processes are in complain mode. 0 processes are unconfined but have a profile defined.Notice that there are no instances of the
docker-defaultAppArmor profile loaded under the processes in enforce mode section. This means that the container you just started does not have thedocker-defaultAppArmor profile attached to it. -
Stop and remove the container started in the previous steps.
$ docker container rm -f apparmor2
ace79581a19a
In this step you learned that the --security-opt apparmor=unconfined flag will start a new container without an AppArmor profile.
Step 4: AppArmor and defense in depth
Defense in depth is a model where multiple different lines of defense work together to provide increased overall defensive capabilities. Docker uses many Linux technologies, such as AppArmor, seccomp, and Capabilities, to form a deep defense system.
In this step you will see how AppArmor can protect a Docker Host even when other lines of defense such as seccomp and Capabilities are not effective.
-
If you haven’t already done so, stop and remove all containers on your system.
$ docker container rm -f $(docker container ls -aq) -
Start a new Ubuntu container with seccomp disabled and the
SYS_ADMINcapability added.$ docker container run --rm -it --cap-add SYS_ADMIN --security-opt seccomp=unconfined ubuntu sh #This command will start a new container with the
default-dockerAppArmor profile automatically attached. seccomp will be disabled and the CAP_SYS_ADMIN capability added. This means that AppArmor will be the only effective line of defense for this container. -
Make two new directories and bind mount them as shown below.
Run this command from within the container you just created.
# mkdir 1; mkdir 2; mount --bind 1 2
mount: mount /1 on /2 failed: Permission denied
The operation failed because the
default-dockerAppArmor profile denied the operation. -
Exit the container using the
exitcommand. -
Confirm that it was the
default-dockerAppArmor profile that denied the operation by starting a new container without an AppArmor profile and retrying the same operation.$ docker container run --rm -it --cap-add SYS_ADMIN --security-opt seccomp=unconfined --security-opt apparmor=unconfined ubuntu sh # mkdir 1; mkdir 2; mount --bind 1 2 # ls -l total 456 drwxr-xr-x 2 root root 4096 Jul 26 11:44 1 drwxr-xr-x 2 root root 4096 Jul 26 11:44 2 drwxr-xr-x 2 root root 4096 Jul 6 23:15 bin drwxr-xr-x 2 root root 4096 Apr 12 20:14 boot <SNIP>The operation succeeded this time. This proves that it was the
default-dockerAppArmor profile that prevented the operation in the previous attempt. -
Exit the container with the
exitcommand.
In this step you have seen how AppArmor works together with seccomp and Capabilities to form a defense in depth security model for Docker. You saw a scenario where even with seccomp and Capabilities not preventing an action, AppArmor still prevented it.
Step 5: Custom AppArmor profile
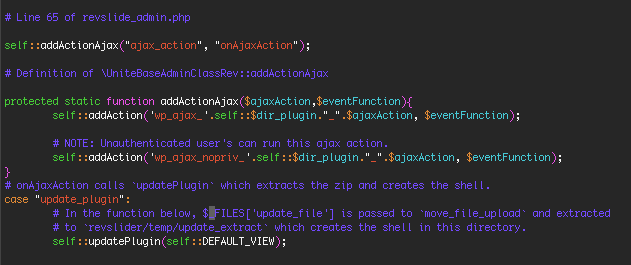
The Panama Papers hack exposed millions of documents from Mossack Fonseca, a Panamanian law firm.
A probable cause, as described by Wordfence and other reports, was an unpatched WordPress plugin. In particular, it has been suggested that the Revolution Slider plugin contained buggy code that allowed another plugin to take its place by making an unauthenticated AJAX call to the plugin.
WordPress and its plugins run as PHP. This means an attacker could upload their own malicious plugin to start a shell on WordPress by simply sending a request to the PHP resource to run the malicious code and spin up the shell.
In this step we’ll show how a custom AppArmor profile could have protected Dockerized WordPress from this attack vector.
- If you have not already, clone the lab and
cdinto the lab’swordpressdirectory.
   $ git clone https://github.com/docker/labs.git
   $ cd labs/security/apparmor/wordpress
- List the files in the directory.
   $ ls -l
   total 24
   -rw-r--r-- 1 root root  628 Jul 11 10:47 docker-compose.yml
   -rw-r--r-- 1 root root  443 Jul 11 10:47 Dockerfile
   drwxr-xr-x 5 root root 4096 Jul 11 10:47 html
   -rw-r--r-- 1 root root  172 Jul 11 10:47 php.ini
   -rw-r--r-- 1 root root 1697 Jul 11 10:47 wparmor
   drwxr-xr-x 6 root root 4096 Jul 11 10:47 zues
-
View the contents of the Docker Compose YAML file.
$ cat docker-compose.yml
wordpress:
 image: endophage/wordpress:lean
 links:
     - mysql
 ports:
     - "8080:80"
 environment:
     - DB_PASSWORD=2671d40f658f595f49cd585db8e522cc955d916ee92b67002adcf8127196e6b2
 cpuset: "0"
 cap_drop:
     - ALL
 cap_add:
     - SETUID
     - SETGID
     - DAC_OVERRIDE
     - NET_BIND_SERVICE
 # **YOUR WORK HERE**
 # Add an apparmor profile to this image
mysql:
 image: mariadb:10.1.10
 environment:
     - MYSQL_DATABASE=wordpress
     - MYSQL_ROOT_PASSWORD=2671d40f658f595f49cd585db8e522cc955d916ee92b67002adcf8127196e6b2
 ports:
     - "3306"
You can see that the file is describing a WordPress application with two services:
- wordpress: a wordpress container that wraps Apache PHP
- mysql: a database to store data
-
Bring the application up.
It may take a minute or two to bring the application up. Once the application is up you will need to hit the
key to bring the prompt to the foreground. You may need to install
docker-composeto complete this step. If your lab machine does not already have Docker Compose isntalled, you can install it with the following commandssudo apt-get updateandsudo apt-get install docker-compose.$ docker-compose up & Pulling mysql (mariadb:10.1.10)... 10.1.10: Pulling from library/mariadb 03e1855d4f31: Pull complete a3ed95caeb02: Pull complete <SNIP> mysql_1 | Version: '10.1.10-MariaDB-1~jessie' socket: '/var/run/mysqld/mysqld.sock' port: 3306 mariadb.org binary distribution wordpress_1 | [Tue Jul 26 12:51:36.992860 2016] [mpm_prefork:notice] [pid 1] AH00163: Apache/2.4.10 (Debian) PHP/5.6.18 configured -- resuming normal operations wordpress_1 | [Tue Jul 26 12:51:36.992956 2016] [core:notice] [pid 1] AH00094: Command line: 'apache2 -D FOREGROUND' -
Point your browser to the public IP of your lab instance on port 8080.
You should have received the IP addresses of all of your lab instances from the lab administrator).

-
Select your language, click Continue and complete the information required on the Welcome page. Make sure you remember the username and password you choose.
-
Login with the username and password you created.
-
Click Plugins from the left-hand navigation pane and install a plugin.
You should notice that the
docker-defaultAppArmor prfile does not restrict the plugin installation. We could be exposed to malicious plugins like in the Panama Papers incident!
In the next few steps you’ll apply a new Apparmor profile to a new WordPress container. The purpose of this is to prevent malicious themes and plugins from being uploaded and installed on our WordPress instance.
-
Bring the WordPress application down.
Run these commands from the shell of your Docker Host, not the shell of the
wordpresscontainer.$ docker-compose stop Stopping wordpress_wordpress_1 ... done Stopping wordpress_mysql_1 ... done $ $ docker-compose rm Going to remove wordpress_wordpress_1, wordpress_mysql_1 Are you sure? [yN] y Removing wordpress_wordpress_1 ... done Removing wordpress_mysql_1 ... done -
Add the
wparmorprofile to thewordpressservice in thedocker-compose.ymlfile. You do this by deleting the two lines starting with#and replacing them with the following two lines:
security_opt:
- apparmor=wparmor
Be sure to add the lines with the correct indentation as shown below.
wordpress:
image: endophage/wordpress:lean
links:
- mysql
<SNIP>
security_opt:
- apparmor=wparmor
mysql:
image: mariadb:10.1.10
environment:
- MYSQL_DATABASE=wordpress
- MYSQL_ROOT_PASSWORD=2671d40f658f595f49cd585db8e522cc955d916ee92b67002adcf8127196e6b2
ports:
- "3306"
If you look closely at the output above, you will see that two new lines have been added above the start of the mysql service definition -
security_opt: - apparmor=wparmor
- Edit the
wparmorprofile to deny every directory under/var/www/html/wp-contentexcept for theuploadsdirectory (which is used for media).
To do this, add the following three lines towards the bottom of the file where it says “YOUR WORK HERE”.
deny /var/www/html/wp-content/plugins/** wlx,
deny /var/www/html/wp-content/themes/** wlx,
owner /var/www.html/wp-content/uploads/** rw,
The * wildcard is only for files at a single level. The ** wildcard will traverse subdirectories.
- Parse the
wparmorprofile.
$ sudo apparmor_parser wparmor
- Bring the Docker Compose WordPress app back up.
$ docker-compose up &
Pulling mysql (mariadb:10.1.10)...
10.1.10: Pulling from library/mariadb
03e1855d4f31: Pull complete
a3ed95caeb02: Pull complete
<SNIP>
mysql_1      | Version: '10.1.10-MariaDB-1~jessie'  socket: '/var/run/mysqld/mysqld.sock'  port: 3306  mariadb.org binary distribution
wordpress_1  | [Tue Jul 26 12:51:36.992860 2016] [mpm_prefork:notice] [pid 1] AH00163: Apache/2.4.10 (Debian) PHP/5.6.18 configured -- resuming normal operations
wordpress_1  | [Tue Jul 26 12:51:36.992956 2016] [core:notice] [pid 1] AH00094: Command line: 'apache2 -D FOREGROUND'
- Verify that the app is up.
$ docker-compose ps
Name Command State Ports
--------------------------------------------------------------------------------------
wordpress_mysql_1 /docker-entrypoint.sh mysqld Up 0.0.0.0:32770->3306/tcp
wordpress_wordpress_1 apache2-foreground Up 0.0.0.0:8080->80/tcp
-
Test that the AppArmor profile is working by uploading an image to the site via the WordPress UI and then trying to upload a plugin. The image upload will work but the plugin upload will fail (when the usual method for uploading plugins fails, WordPress prompts you to upload via FTP - this is a sign that the AppArmor profile has worked).
-
Bring the application down.
$ docker-compose stop
Stopping wordpress_wordpress_1 ... done
Stopping wordpress_mysql_1 ... done
$
$ docker-compose rm
Going to remove wordpress_wordpress_1, wordpress_mysql_1
Are you sure? [yN] y
Removing wordpress_wordpress_1 ... done
Removing wordpress_mysql_1 ... done
Congratulations! You’ve secured a WordPress instance against adding malicious plugins :)
Step 5: Extra for experts
AppArmor profiles are very application-specific. Although we’ve had some practice writing our own profiles, the preferred method is using tools to generate and debug them. In this step We’ll explore aa-complain and aa-genprof that ship as part of the apparmor-utils package.
The following steps assume you are using a modern Ubuntu Linux Docker Host with a GUI installed and the FireFox web browser.
-
Install the
apparmor-utilspackage.$ sudo apt install apparmor-utils -y -
Start
aa-genprofto automatically generate a new AppArmor profile for the FireFox app.
$ sudo aa-genprof firefox
Your terminal will go into interactive mode. This is AppArmor watching the Firefox app.
-
Open Firefox and perform normal web browsing activities such as browsing websites and downloading content.
-
Go back to the terminal running
aa-genprofand presssto view events from the system log and decide whether or not to include these events in your AppArmor profile as an allow or deny statement. -
When you’re done, press
fto finish.The AppArmor profile will be called
usr.bin.firefoxand will be stored in/etc/apparmor.d/on Ubuntu systems.You can also use
aa-autodepto automatically generate profiles, but this will create an even more minimal profile.
To further refine an existing profile, aa-logprof operates in the same manner as aa-genprof but for amending a profile by scanning logs.
You can debug AppArmor profiles with aa-complain. As described earlier, AppArmor has a “complain” mode that logs disallowed events instead of actively blocking them. This is a great tool for testing and debugging.
Type the following command to view the Firefox profile - sudo aa-complain /etc/apparmor.d/usr.bin.firefox. Confirm that this set the Firefox policy to complain mode by running apparmor_status.
To view any complaints from apparmor, run dmesg.
Congratulations you have completed this lab on AppArmor!