
Implementing High Availability with Docker Swarm
Setting up Docker Swarm HA for production is an easy job. It is much simpler than attempting to deploy Kubernetes HA cluster. However, when deciding which to use, one should consider other criteria. Kubernetes while much more complex comparing to Swarm, provides many more functions out of the box. It also requires slightly different structure for your project.
Entire process setting up Docker Swarm HA cluster fits in just a few steps:
- Prepare all nodes
- Initialize first cluster manager
- Add more manager nodes
- Add worker nodes
- Deploy a web interface
- Deploy first stack using web interface
Note: For this process as usual I will use Centos7 as it is my favorite Linux distro. Whichever distribution you choose the steps are very similar. I will be doing this on DigitalOcean.
Prerequisites
3 or more hosts for managers. When planning Docker Swarm HA cluster for production need to take in account resiliency of master nodes. Swarm uses Raft consensus protocol, which is similar to etcd used in Kubernetes. Swarm cluster can keep full functionality only if more than half of all manager nodes still available. Therefore, if we can tolerate loss of 1 manager node, then we are required to have 3 managers. If we are okay with losing 2 manager nodes, we must have 5 of them in total. And so on.
Private networking between all manager and worker nodes. It is not a strict requirement. Newer versions of Swarm use SSL encryption for control plane communication. However, it will send data traffic between containers unencrypted. It is possible to configure encryption on data plane as well, but this needs additional setup. For this example we will use Digital Ocean private networking, which lets us keep data plane unencrypted.
Access from Internet to access example application. And Internet access on all nodes for installation process and access to Docker resources.
For this example I will launch 5 nodes. 3 for managers will be named manager1, manager2 and manager3. 2 for workers where our application will be running. Worker nodes will be named worker1 and worker2. All nodes will have public IP address as all DO hosts come with public IP, but also will have private networking enabled to allow communication between nodes. This will result in each node having 2 interfaces eth0 for public access and eth1 for private network. Depending on your environment you may only have one interface with private IP address. This is what happens on AWS, for example.
NOTE: For production cluster you should also take care of security. For public access you ideally should only open ports on which your application will be accessed by legitimate users. Also it is best not to have public access to your manager nodes at all. You can configure VPN or some other secure approach to access them. For internal communication here is the comprehensive list of ports and protocols used.
Prepare all nodes
NOTE: This part should be done on all nodes of your cluster. Preparation step is very simple and anyone who works with Docker is very familiar with this process. All we need is to install latest Docker. This step simply follows official Docker documentation.
First, install required dependencies:
$ sudo yum install -y yum-utils device-mapper-persistent-data lvm2
Second, add Docker repository:
$ sudo yum-config-manager --add-repo https://download.docker.com/linux/centos/docker-ce.repo
Install Docker CE:
$ sudo yum install -y docker-ce
Enable Docker start on boot and start daemon:
$ sudo systemctl enable docker
$ sudo systemctl start docker
Initialize first cluster manager
NOTE: This part should be done only on one of designated manager nodes. In this example I do this on manager1. Initialize Docker Swarm cluster. Note –advertise-addr and –data-path-addr both set to eth1. This is to make sure that all communication goes through private network only:
$ sudo docker swarm init --advertise-addr=eth1 --data-path-addr=eth1
If cluster was initialized successfully you will see output similar to this:
Swarm initialized: current node (ppp9aa6itx4r3e4u4rsbb6u7g) is now a manager.
To add a worker to this swarm, run the following command:
docker swarm join --token SWMTKN-1-05r99dbfwrvg4ic31783gk9o24sq9hkkdt4ruoaybmpzs3dtor-a9ujgk4iy3f86bs7xecysta2n 10.136.166.159:2377

To add a manager to this swarm, run  'docker swarm join-token manager' and follow the instructions.
You can also verify status by listing all current nodes and their status:
$ sudo docker node ls
The output at this stage will similar to below:
ID                            HOSTNAME            STATUS              AVAILABILITY        MANAGER STATUS      ENGINE VERSION
ppp9aa6itx4r3e4u4rsbb6u7g *   manager1            Ready               Active              Leader              18.09.0
Add more manager nodes NOTE: This part should be done only on remaining manager nodes. In this example it is manager2 and manager3. Additionally in case of DigitalOcean, AWS or other cloud providers we should launch manager nodes in separate data centers to achieve actual High Availability setup. First, display shell command for joining new managers to cluster:
manager1$ sudo docker swarm join-token manager
The output will be:
To add a manager to this swarm, run the following command:

    docker swarm join --token SWMTKN-1-05r99dbfwrvg4ic31783gk9o24sq9hkkdt4ruoaybmpzs3dtor-304rmelcpj5k46baa59einuv8 10.136.166.159:2377
On remaining manager nodes use modified version of this command. Just add same arguments as we did on first node –advertise-addr=eth1 –data-path-addr=eth1:
$ sudo docker swarm join --advertise-addr=eth1 --data-path-addr=eth1 --token SWMTKN-1-05r99dbfwrvg4ic31783gk9o24sq9hkkdt4ruoaybmpzs3dtor-304rmelcpj5k46baa59einuv8 10.136.166.159:2377
The output will be rather simple:
This node joined a swarm as a manager.
Now, verify current cluster status:
$ sudo docker node ls
The output should be similar to this:
ID                            HOSTNAME            STATUS              AVAILABILITY        MANAGER STATUS      ENGINE VERSION
ppp9aa6itx4r3e4u4rsbb6u7g     manager1            Ready               Active              Leader              18.09.0
xskfh4of12jogw29jklawcy2b     manager2            Ready               Active              Reachable           18.09.0
f81xxoyhwbh745nurw2nur570 *   manager3            Ready               Active              Reachable           18.09.0
We have our Docker Swarm HA cluster up and running!
It already works, but if you were to launch a stack on this cluster it would have to run on managers. And if you recall the security note above, it is not a good idea. In production it will be bad design to allow production application run on manager nodes. We should isolate them if possible and only run management related things on manager nodes as well as not send any production traffic through them.
Add worker nodes NOTE: This part should be done only on designated worker nodes. In this example it is worker1 and worker2. First, on any of managers run this command to show token for joining cluster as worker:
$ sudo docker swarm join-token worker
The output will be similar to below:
To add a worker to this swarm, run the following command:
docker swarm join --token SWMTKN-1-05r99dbfwrvg4ic31783gk9o24sq9hkkdt4ruoaybmpzs3dtor-a9ujgk4iy3f86bs7xecysta2n 10.136.166.220:2377
On each worker we will use this command adding same arguments as before to isolate internal comms to private network only:
$ sudo docker swarm join --advertise-addr=eth1 --data-path-addr=eth1 --token SWMTKN-1-05r99dbfwrvg4ic31783gk9o24sq9hkkdt4ruoaybmpzs3dtor-a9ujgk4iy3f86bs7xecysta2n 10.136.166.220:2377
It will produce output:
This node joined a swarm as a worker.
Veirfy again list of nodes and their status:
$ sudo docker node ls
ID                            HOSTNAME            STATUS              AVAILABILITY        MANAGER STATUS      ENGINE VERSION
ppp9aa6itx4r3e4u4rsbb6u7g     manager1            Ready               Active              Leader              18.09.0
xskfh4of12jogw29jklawcy2b     manager2            Ready               Active              Reachable           18.09.0
f81xxoyhwbh745nurw2nur570 *   manager3            Ready               Active              Reachable           18.09.0
s6lwqd5nir2u4pva58uy5ryhy     worker1             Ready               Active                                  18.09.0
n3efneuhnwa57869tox6sdlhv     worker2             Ready               Active                                  18.09.0
Deploy a web interface There are multiple web interfaces that are available for Docker Swarm HA clusters, I highly recommend Portainer. In my opinion, it is almost perfect for managing Swarm and misses just a few components that I will cover in another article.
We will use Portainer official documentation to deploy it. First, on any of managers get stack definition file:
$ curl -L https://downloads.portainer.io/portainer-agent-stack.yml -o portainer-agent-stack.yml
By default Portainer will publish on port 9000, if you want to use different port, simply edit first value in file we just downloaded:
- "9000:9000"
Now, deploy the stack to Docker Swarm HA cluster:
$ sudo docker stack deploy --compose-file=portainer-agent-stack.yml portainer
Give it a few seconds to start everything up and deploy all resources. Once all resources provisioned, you will be able to access web interface in browser on http://manager1_ip_address:9000 (replace IP address and port with your corresponding values). You will be first offered to set password for admin user. After this you will see a new and shiny dashboard:

Congrats! Now you have fully functional Docker Swarm HA cluster with a nice management Web UI.
Deploy first stack using web interface
Using Web UI allows for incredibly easy management and deployment of stacks in Docker Swarm HA cluster. As an example of application we will deploy Example Voting App. With a few changes to ensure proper resources allocation. In Dashboard navigate to Stacks and click “Add Stack” and select “Web Editor” option to input YAML document for our stack directly. Input a name for this stack, for example “votingapp” and in editor input below document:
version: "3"
services:
  redis:
    image: redis:alpine
    networks:
      - backend
    deploy:
      replicas: 2
      update_config:
        parallelism: 2
        delay: 10s
      restart_policy:
        condition: on-failure
      placement:
        constraints: [node.role == worker]
  db:
    image: postgres:9.4
    volumes:
      - db-data:/var/lib/postgresql/data
    networks:
      - backend
    deploy:
      placement:
        constraints: [node.role == worker]
  vote:
    image: dockersamples/examplevotingapp_vote:before
    ports:
      - 5000:80
    networks:
      - frontend
    depends_on:
      - redis
    deploy:
      replicas: 2
      update_config:
        parallelism: 2
      restart_policy:
        condition: on-failure
      placement:
        constraints: [node.role == worker]
  result:
    image: dockersamples/examplevotingapp_result:before
    ports:
      - 5001:80
    networks:
      - backend
    depends_on:
      - db
    deploy:
      replicas: 2
      update_config:
        parallelism: 2
        delay: 10s
      restart_policy:
        condition: on-failure
      placement:
        constraints: [node.role == worker]
  worker:
    image: dockersamples/examplevotingapp_worker
    networks:
      - frontend
      - backend
    deploy:
      mode: replicated
      replicas: 1
      labels: [APP=VOTING]
      restart_policy:
        condition: on-failure
        delay: 10s
        max_attempts: 3
        window: 120s
      placement:
        constraints: [node.role == worker]
networks:
  frontend:
  backend:
volumes:
  db-data:
Finally, click “Deploy Stack” button to deploy this application.
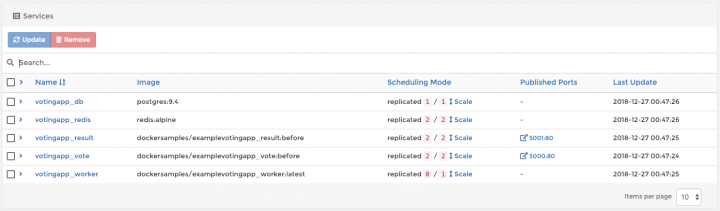
Now, click on newly created stack and you will see stack services deployment progress:
Wait until all components are started and try opening http://worker1_ip_address:5000 and http://worker2_ip_address:5001 in your browser. You will get a voting application to cast your vote for Cats vs Dogs (I always vote for latter, by the way).
Final notes Unlike deploying Kubernetes HA cluster the process to deploy Docker Swarm HA cluster is very simple and straightforward. It can be done in a few simple steps. Anyone going through this process should pay attention to multiple points:
- Calculate your manager node resiliency according to number of nodes you can possibly lose. You should have minimum 3 managers. In this case you can lose at most 1 manager node
- If you lost more than half of manager hosts, your cluster will be not functional anymore. In case of 3 managers this will happen when you lost any 2 of them
- Design High Availability before starting building the system. Think about multiple zones. Label your nodes according to zones
- Isolate managers from workers. Do not run your applications on managers, you have workers exactly for that. Only acceptable application to run on managers is a Web UI
- Minimize attack surface on manager nodes by restricting access to them from Internet. For example, setup VPN to access them. Or use firewall rules to lock down access to them only to trusted source IP addresses
- Make sure control and data plane communication of your cluster happens over private network. If you are building distributed Docker Swarm HA cluster, use SSL encryption for data plane using overlay networks with encryption options
- Learn how to properly add/remove managers to ensure cluster normal operations despite doing changes. Also important to learn how to recover from failures such as loss of manager quorum. All of this described in great details in Swarm guide.
Contributor -
Sangam biradar -https://engineitops.icu